How to migrate Changes in Migration files in Laravel

After I change something in my migration file in laravel, I need to re-migrate it. Here are the steps I made to accomplish it.

OPTION 1:
Just run a refresh

php artisan migrate:refresh

Continue reading “How to migrate Changes in Migration files in Laravel”

Install LAMP stack in Ubuntu 14.04

How to install LAMP in Ubuntu 14.04

I wanted to setup a LAMP stack on my Ubuntu. I was kind of hopin that it would be just a walk in the park as what i did with windows WAMP. I tried googling the steps and did find some nice tutorials. I will walk you through with my installation and hope i’d be successfull with this exercise.

So lets get it on

Step 1 : — Install Apache
First though we need to update our system

sudo apt-get update

Then we can install apache

sudo apt-get install apache2

After the installation you can open your browser and in the address bar just type

http://localhost

You will see the Apache 2 Ubuntu Default Page
mysql root password

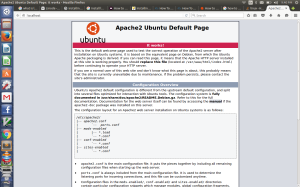
And it says “It works!” hehehe, you can take a deep breath for now

Note : After you installed apache2 it will create the document root directory at /var/www/html

Step 2 : Install Mysql

sudo apt-get install mysql-server php-mysql

Notice that we added “php5-mysql” so that php5 and mysql can properly communicate with each other (“some helper tools”).

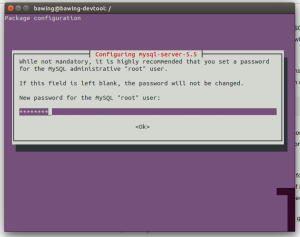
During installation it will prompt you to enter a root security password for the root access of your mysql database.
mysql install

After the installation you can check if mysql is running by typing:

mysql -u root -p
Enter password: "here you type your password"

then you should see the server verion of your mysql and other stuff. Just type “exit” to go back to command prompt.

We need to execute and tell MYSQL to create its database directory structure where it will store its information.

sudo mysql_install_db

Then secure your mysql installation especially in actual production mode

sudo mysql_secure_installation

You will be ask security questions. I answered “Y” for all of its questions hehehe just bring it on.

Step 3 : Install PHP

sudo apt-get install php5 libapache2-mod-php5 php5-mcrypt

After installation you can start with a project by creating an html file at “/var/www/html”. By default apache would give priority to index.html file but we all want to give hail to index.php. So to do that we edit dir.conf

sudo nano /etc/apache2/mods-enabled/dir.conf

It should return something like this


        DirectoryIndex index.html index.cgi index.php index.pl index.xhtm$

So change the order, put index.php first on the list like this


        DirectoryIndex index.php index.html index.cgi index.pl index.xhtm$

Then save. Ctrl – X then “Y”

It is important to notice that we change some behavior of apache2 to identify .php prior to .html and others, so we need to restart the service for the change to take effect.

sudo service apache2 restart

Then install php modules ( check for available modules )

apt -cache search php5-

Next step is testing the PHP

create a file named test.php in “/var/www/html” and inside test.php write

phpinfo();

Then open the browser ahd in the address bar type

http://localhost/test.php

php install
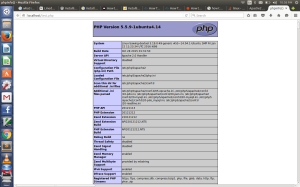
You should see PHP Version in your screen and its configuration and lots of information.

Yes we did it! we did it! Time to coooooooooooooooooode! Good day everyone!

AH01630: client denied by server configuration

This error occurred when i installed “wampserver2.5-Apache-2.4.9-Mysql-5.6.17-php5.5.12-32b”. And to fix the error you have to edit your httpd-vhosts.conf. Add the following line.

Require all granted

So that it would look like this.

<VirtualHost *:80>

DocumentRoot “D:\workspace\ci_store01”
ServerName “ci_store01”
serverAlias “ci_store01”
ErrorLog “D:\zend\workspace\error.log”
<Directory “D:\workspace\ci_store01”>
AllowOverride AuthConfig FileInfo Indexes Limit Options
Order deny,allow
Allow from all
Require all granted
</Directory>

</VirtualHost>


XSS attacks

There are a number of ways hackers put to use for XSS attacks,
PHP's built-in functions do not respond to all sorts of XSS attacks.
Hence, functions such as strip_tags, filter_var, mysql_real_escape_string,
htmlentities, htmlspecialchars, etc do not protect us 100%. You need a better
mechanism, here is what is solution:
function xss_clean($data)
{
// Fix &entity\n;
$data = str_replace(array('&amp;','&lt;','&gt;'), array('&amp;amp;','&amp;lt;','&amp;gt;'), $data);
$data = preg_replace('/(&#*\w+)[\x00-\x20]+;/u', '$1;', $data);
$data = preg_replace('/(&#x*[0-9A-F]+);*/iu', '$1;', $data);
$data = html_entity_decode($data, ENT_COMPAT, 'UTF-8');

// Remove any attribute starting with "on" or xmlns
$data = preg_replace('#(<[^>]+?[\x00-\x20"\'])(?:on|xmlns)[^>]*+>#iu', '$1>', $data);

// Remove javascript: and vbscript: protocols
$data = preg_replace('#([a-z]*)[\x00-\x20]*=[\x00-\x20]*([`\'"]*)[\x00-\x20]*j[\x00-\x20]*a[\x00-\x20]*v[\x00-\x20]*a[\x00-\x20]*s[\x00-\x20]*c[\x00-\x20]*r[\x00-\x20]*i[\x00-\x20]*p[\x00-\x20]*t[\x00-\x20]*:#iu', '$1=$2nojavascript...', $data);
$data = preg_replace('#([a-z]*)[\x00-\x20]*=([\'"]*)[\x00-\x20]*v[\x00-\x20]*b[\x00-\x20]*s[\x00-\x20]*c[\x00-\x20]*r[\x00-\x20]*i[\x00-\x20]*p[\x00-\x20]*t[\x00-\x20]*:#iu', '$1=$2novbscript...', $data);
$data = preg_replace('#([a-z]*)[\x00-\x20]*=([\'"]*)[\x00-\x20]*-moz-binding[\x00-\x20]*:#u', '$1=$2nomozbinding...', $data);

// Only works in IE: <span style="width: expression(alert('Ping!'));"></span>
$data = preg_replace('#(<[^>]+?)style[\x00-\x20]*=[\x00-\x20]*[`\'"]*.*?expression[\x00-\x20]*\([^>]*+>#i', '$1>', $data);
$data = preg_replace('#(<[^>]+?)style[\x00-\x20]*=[\x00-\x20]*[`\'"]*.*?behaviour[\x00-\x20]*\([^>]*+>#i', '$1>', $data);
$data = preg_replace('#(<[^>]+?)style[\x00-\x20]*=[\x00-\x20]*[`\'"]*.*?s[\x00-\x20]*c[\x00-\x20]*r[\x00-\x20]*i[\x00-\x20]*p[\x00-\x20]*t[\x00-\x20]*:*[^>]*+>#iu', '$1>', $data);

// Remove namespaced elements (we do not need them)
$data = preg_replace('#</*\w+:\w[^>]*+>#i', '', $data);

do
{
	// Remove really unwanted tags
	$old_data = $data;
	$data = preg_replace('#</*(?:applet|b(?:ase|gsound|link)|embed|frame(?:set)?|i(?:frame|layer)|l(?:ayer|ink)|meta|object|s(?:cript|tyle)|title|xml)[^>]*+>#i', '', $data);
}
while ($old_data !== $data);

Reminder: Filter Functions

PHP Filter Functions

PHP: indicates the earliest version of PHP that supports the function.

Function Description PHP
filter_has_var() Checks if a variable of a specified input type exist 5
filter_id() Returns the ID number of a specified filter 5
filter_input() Get input from outside the script and filter it 5
filter_input_array() Get multiple inputs from outside the script and filters them 5
filter_list() Returns an array of all supported filters 5
filter_var_array() Get multiple variables and filter them 5
filter_var() Get a variable and filter it 5

Continue reading “Reminder: Filter Functions”

Up ↑